|
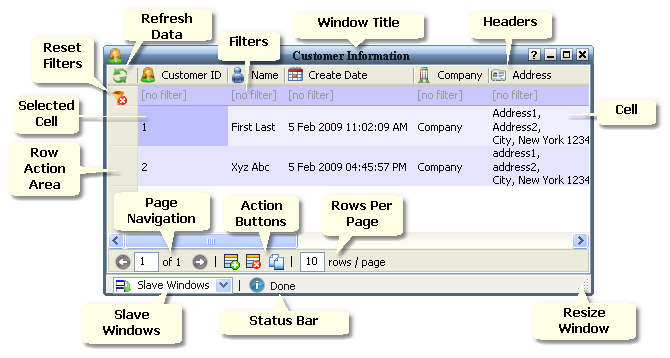
The table window is the most common type of window in the Cool Wave theme.
 Simple table window Simple table window
A simple table window is shown below:
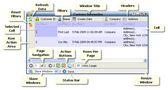 | | A simple table window under the Cool Wave theme |
Here is the description of the different parts of the window:
| ▪ | Window Title: The title of the window |
| ▪ | Headers: The name of the data in each column |
| ▪ | Filters: Click on these to set the filters for each column |
| ▪ | Row Action Area: Icons in this area show the status of the row. Some icons can be clicked to perform an action. A list of icons that can appear in this area is given below |
| ▪ | Cells: Each cell contains a piece of data. Some cells can be edited. Cells sometimes have icons within them to represent the status of the cell. A list of icons that can show up is given below |
| ▪ | Page Navigation: When there are too many rows to display, you can use this section to move between pages |
| ▪ | Action Buttons: Clicking these buttons performs various operation. A list of available buttons is given below |
| ▪ | Rows Per Page: Number of rows to display per page |
| ▪ | Slave Windows: More on slave windows below |
| ▪ | Status Bar: Useful comments about operations you are about to perform or have already performed |
The icons that can appear in the Row Action Area along with a short description follow:

|
This icon is a clickable save button. Click to save the modifications made to the row. The changes will then be sent to the server to update the database.
|

|
This icon indicates that the row is a new row that hasn't yet been modified and saved to the server.
|

|
This icon appears when some processing is in progress (for example, when modification made to a row have been sent to the server). You will not be able to edit the cells of the row while this icon is displayed.
|

|
This icon indicates that the operation being performed on the row was successful. This icon will disappear automatically after 10 seconds.
|

|
This icon indicates an unsuccessful row operation. You can hover the mouse over this icon to know what went wrong. You can retry the operation on the row after correcting the problem.
|
The icons that can appear in a cell along with a short description follow:

|
This icon indicates that the contents of the cell have been modified, but not yet saved onto the server.
|

|
This icon appears when the row is being processed. An example is when the row data is being sent to the server to be saved into the database
|

|
This icon appears when there was an error with the cell while processing the row. It is possible that some data in the cell was invalid and couldn't be processed. You can retry the operation on the row after correcting the problem.
|
The Action Buttons along with a short description follow:

|
Use this button to add a new row into the table window. You can edit the cells of the newly added row and save it to the server. Some table windows might not allow you to add a new row. You can use the Insert key as a shortcut to add a new row.
|

|
Use this button to delete rows from the table window. On successful processing of this action, the row is deleted from the server and cannot be recovered You can use the Delete key as a shortcut to delete a row.
|

|
Use this button to copy data from the table window into a spreadsheet. You can use the Ctrl-Alt-C key combination as a shortcut to copy data.
|
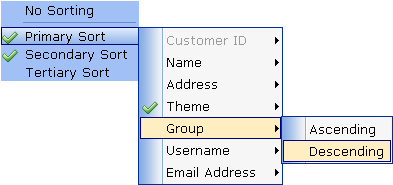
Table windows can be sorted by up to three levels by clicking on the headers to bring up the sort menu shown below:
 | | Cool Wave Table Window Sort Menu |
While sorting on the selected primary field, if there are rows with the same data for the field, the secondary field data will be used to further sort those rows. Similarly, the tertiary field is used in case the secondary field data too is the same.
|
Navigating within table windows
Using the mouse, clicking on a cell navigates to that cell and double clicking on a cell will edit its contents if it is editable.
The table below shows the keyboard navigation keys available to you:
Up arrow
|
One cell up
|
Down arrow
|
One cell down
|
Left arrow
|
One cell left
|
Right arrow
|
One cell right
|
Ctrl Left or Home
|
Leftmost cell of the current row
|
Ctrl Right or End
|
Rightmost cell of the current row
|
Ctrl Up
|
Topmost cell of the current column
|
Ctrl Down
|
Bottommost cell of the current column
|
Page Up
|
Scroll up
|
Page Down
|
Scroll down
|
Ctrl Home
|
Move to top left cell in the table
|
Ctrl End
|
Move to bottom right cell in the table
|
F2 or Enter
|
Edit a cell if it is editable
|
Escape
|
When editing a cell, cancels edit and restores the cell data to what it was before editing
|
|
Editing cells in table windows
If a cell is editable, you can edit it by navigating to it and pressing F2 or Enter. You can also double click on the cell to edit it. To apply the changes you make after editing a cell, you can click on any other cell in the table or hit enter. Pressing escape will discard any changes you have made and restore the cell to the way it was before you started editing it.
The edit mode a cell enters will differ depending on the type of data in the cell. The following are screenshots of the different different edit modes available:
Edit Mode
|
Screenshot
|
Description
|
Textbox
|
|
A textbox is the most basic type of edit mode. You can type directly into it.
|
Dropdown list
|
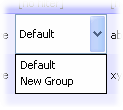
|
A dropdown list allows you to choose from a list of choices.
You can quickly select one of the options by typing the first letter of the option.
You can also click on the down arrow next to it and select an option using the mouse.
|
Date
|
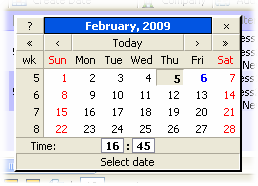
|
The date mode allows you to choose a date. You can drag the entire date panel using the blue bar with the date at the top.
Clicking on « and » allows you to choose the year. You can press and hold down the left mouse button on them to select a specific year quickly. Similarly, ‹ and › can be used to select the month. Click on Today to select today's date.
If the time is displayed, it can be changed using the left mouse button and shift left mouse button to increase and decrease the values. You can also click and drag to change the values faster.
The keyboard arrow keys can be used to move from one date to another. Ctrl left and right changes the month and Ctrl up and down changes the year.
|
Panel
|
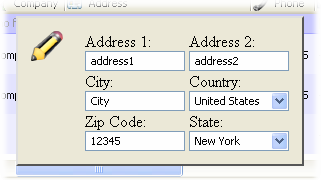
|
The panel mode allows you to edit complex cell data. It contains various elements depending on the data in the cell.
You can navigate between elements using Tab and Shift Tab or by just clicking on the element.
You can drag the entire panel around using the image in the top left corner.
|
|
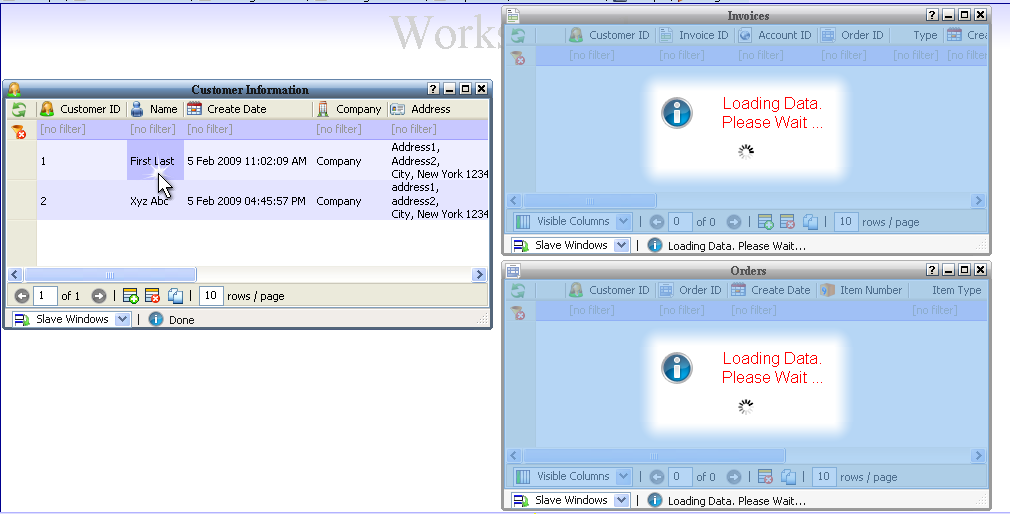
Slave windows
You might have observed the Salve Window dropdown box on the bottom left of the table windows next to the status bar. An expanded Slave Window dropdown is shown below:
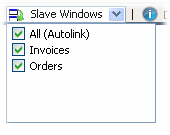
You can use this to link the window to the filters of other windows. We call the window in which you are selecting the slave windows as the master window and the ones that are being selected are called slave windows. When you click on a new row in the master window, all the slave windows will filter themselves based on the data of that row in the master window.
Lets consider an example. Lets say you have a Customer Information window as the master window and two slave windows - an Invoice window and an Order window. As soon as you click on a new row in the Customer Information window, the Invoice and Order windows will filter themselves based on the Customer ID of the row selected in the Customer Information window. The two windows in the process of filtering themselves are shown in the screenshot below:
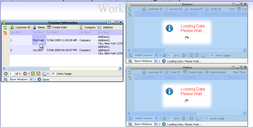 | | Cool Wave Slave Windows |
Another option in the Slave Windows dropdown is the "All (Autolink)" option. This option will automatically make any new windows you open within the same workspace slave windows of the current window if the fields to filter on match. This saves you the trouble of adding each new window as a slave window.

|
Using too many slave windows could increase the load on your server
Since every click on a new row in the master window results in the slave windows refreshing their data, which in turn results in a call to the web server, having too many slave windows can cause many requests to be made to the server. Be sure to uncheck the checkboxes in the Slave Windows dropdown when you are no longer using them.
|
|
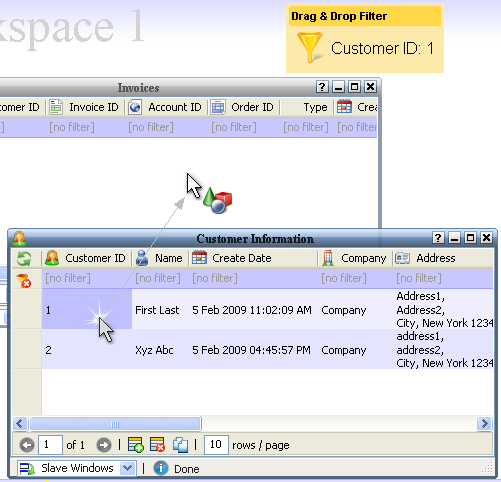
Drag and drop filtering
Instead of using Slave Windows, it is possible to simply drag a row from one window to another to filter the destination window based on the source row's data. The screenshot below shows a row being dragged from a Customer Information window to an Invoice window:
 | | Cool Wave Drag Drop Filter |
The tooltip at the top right corner of the workspace gives you an indication as to what the filter field(s) will be. When you let go of the mouse button on the Invoice window, it will filter itself according to the Customer ID of the row that was dragged from the Customer Information window.
|
Complex table windows
A complex table window is shown below:
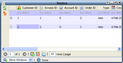 | | Cool Wave Complex Table Window |
It is quite similar to a simple table window, except for the first column which contains + and - images to expand and collapse the row. In the above screenshot of the Invoice window, each collection of rows under the + / - sign belongs to one invoice. Each row represents one invoice item. All the values common to the entire invoice appear on the first row.
The entire collection of rows representing one invoice is modified, saved and deleted together. When you click on the add new row or delete row buttons, you will be asked if you would like to perform the operation on the entire invoice or a single invoice item.
Performing a delete operation on the first invoice item in the above example could be confusing for beginners since the first row also contains all the common invoice fields. So, lets go into a few details about it. When you select a cell on the first row of the invoice and click on the delete row button, you will be asked if you would like to delete the entire invoice or just an invoice item. If you select the invoice, the entire invoice will be deleted. If you select invoice item, only the first invoice item is deleted. However, the common invoice fields are NOT deleted since you are deleting only the invoice item. So, there should be no confusion - when you choose to delete the invoice, the entire invoice is deleted, while if you choose to delete an invoice item, even if its the first one, only that single invoice item is deleted.
|
|


 Expand All
 Collapse All